Showing posts with label remodel. Show all posts

Monday, April 13, 2015

If you start a remodel project......

Have you ever read the book "If You Give A Mouse A Cookie"?  I kind of feel like I need to re-write the book for people who are doing a remodel.

Title: If you start a remodel project (even a little one)......

Here is how our story would go.

If you start a renovation and try to keep it in just the kitchen it won't work.  

Because if you scrape the popcorn ceiling you will have to scrape it in the living room to keep the "look" consistent.

If you scrape the popcorn ceilings, the paint will need to be touched up.  If the paint needs to be touched up then you might as well refresh the color and make it match the new kitchen (especially if the paint color is over 12 years old and you don't have any leftover).  

If you change the color of the cabinets then the railings and hand rails will look terrible and out of date so you need to paint them.

If you paint the railings then you need to paint the window sills and the fireplace mantle.

If you paint the fireplace mantle then you should do something about the terrible tile on the fireplace that you have hated since you moved in 14 years ago.

Whew...glad that is done.  But there's more.  If you replace the flooring in the kitchen, it should match, so replace it everywhere.

And so forth and so on.  Get the picture.  Suddenly a one-room project because a whole main floor project.

But it is nice to have a clean, fresh update to most of our communal living spaces.

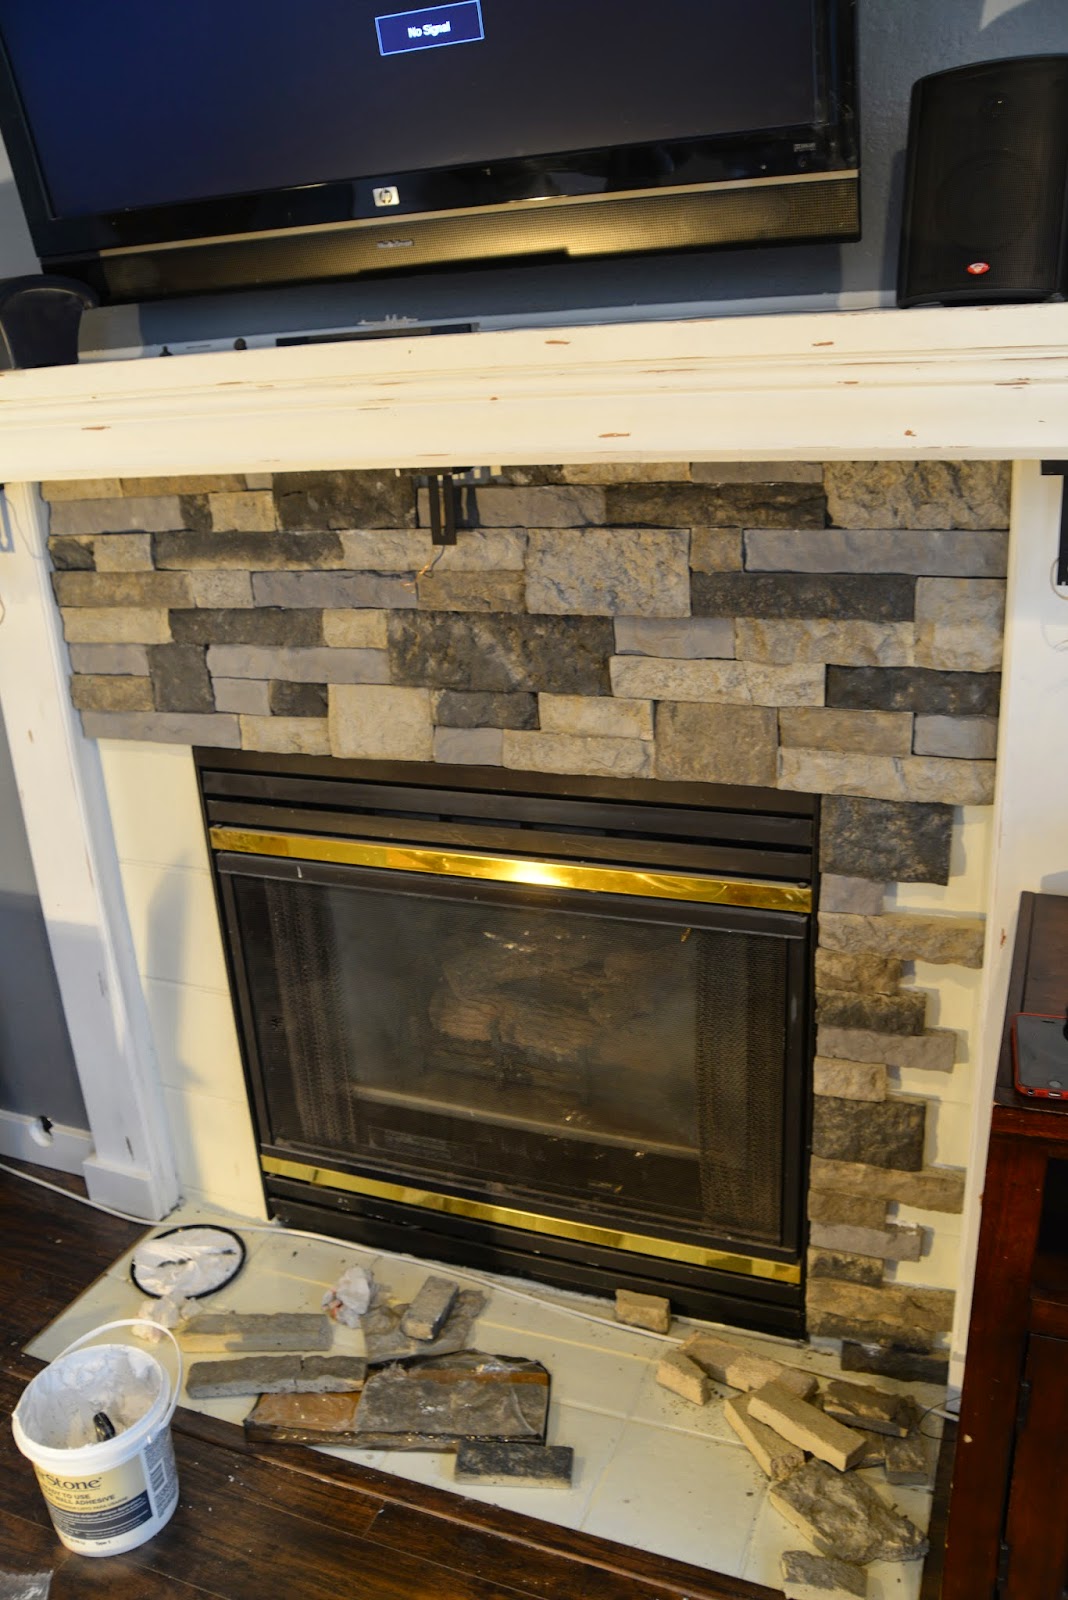
I didn't really take any "before" pictures of this room because we weren't really planning on doing anything to this room.  So here is my one "before picture".
And another construction picture for you.

Of course, we had to add some new lighting as it is kind of a "why not" or a "we will regret it later if we don't now".  So we now have 4 pretty new lights in the ceiling (whereas before we had ZERO- just a lamp in the corner). 
Here is the final outcome.  I love the coat rack I found at World Market.  This door goes to the garage and there isn't a coat closet or any area for our coats/gloves/backpacks so it was nice to find this piece.  The new doors and molding also make this space feel, clean and airy.
I also have always wanted to decorate my mantle but never really knew what to do with my old, ugly mantle.  So I had a blast finding all of these bits and putting them together.  So nice to have a room that feels updated and FINISHED!

I went with a bluish/greenish color on the wall to help the space feel a little bit warmer.  We also stuck with red accents to keep consistent with the kitchen.  I had an entire gallon of Gotham Gray left so I decided to make the TV wall gray.  It works and it was free (not free but you get the picture).

My favorite change to the living room is the re-faced fireplace.  We (by we, I mean me and my sister) used Airstone.  It is a product carried by Lowe's.  I wanted the gray toned one which my Lowe's didn't have in stock.  So I ordered it online (thank goodness for the internet, amen?).  They shipped it for free and their customer service was fantastic.  It got here in record time.  I even ordered the "glue" compound stuff online because, why not?  It was delivered to my house and I didn't even have to go to my local store (#lazy).  You can find the product here.
Fireplace "before".  Although I had already painted the mantle.  It used to be the 1980's wood.  When we first moved the tile was a baby blue marbled tile.  I HATED it and wanted to make the room warmer and painted a golden color that TOTALLY clashed with the baby blue.  So I found some tile paint and painted it white.  It was a good, cheap fix that has lasted us for a long time.  However, the white was getting dingy and I wanted something more sophisticated so the Airstone was perfect for this project.  Cheap, easy and really transforming!
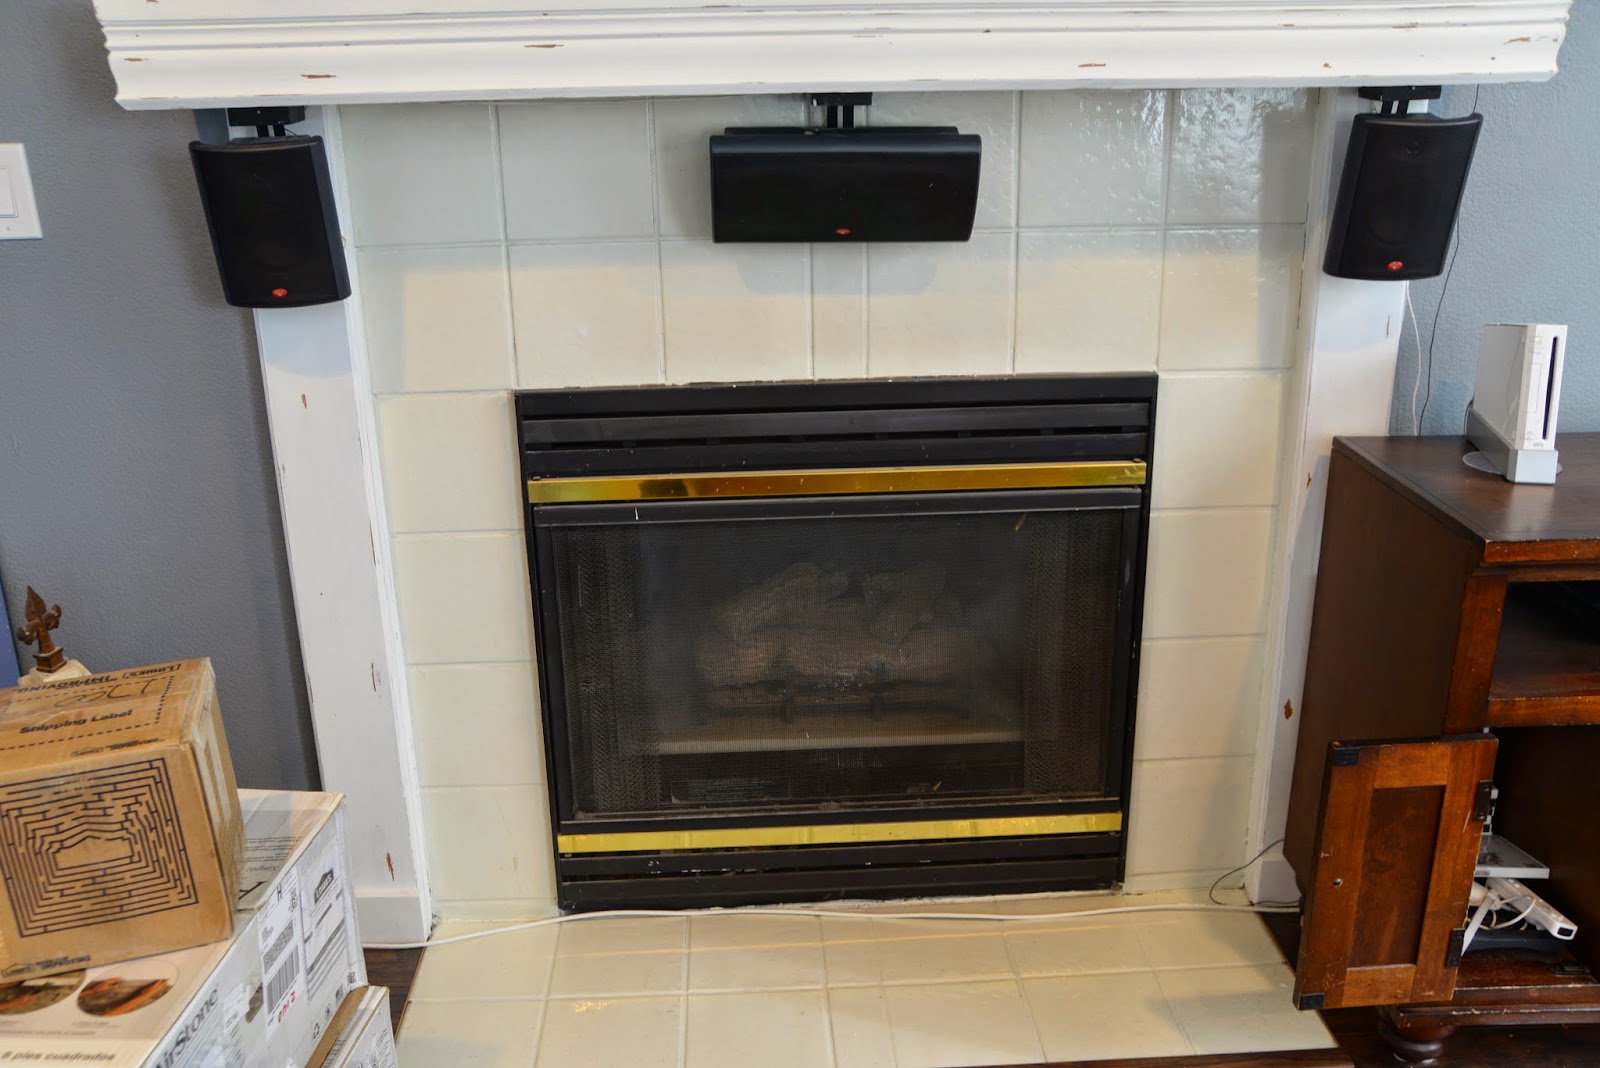
It was SO easy to install.  All you need is the adhesive, a hack saw and the materials.  I didn't need any corner pieces so I just got 2 boxes of the straight pieces.  Within the box is a variety of colors (shades of gray in my case), widths and lengths.  They all fit together nicely.  I started from the top so I could make sure that they top looked nice and that I could just add filler at the bottom if needed.  I was really lucky in that the pieces fit PERFECTLY and I didn't have to cut a row in half to make it work. All you have to know how to do is frost a cake or butter some bread.  Seriously.  The adhesive just spreads on like cream cheese and then you stick the Airstone to the fireplace.  I kept reading blogs and looking on Pinterest because surely it can't be that easy.  Stop here people.  It is THAT easy.
If you have any questions as to how I did this, feel free to ask!

This project would be perfect if you wanted a faux rock wall or anything!  I also have about 3/4 of a box leftover sitting in my garage.  Anyone want to buy it off of me?  I will give you a deal.  This whole project cost around $135 (less if someone wants to buy my 3/4 of a box leftover).  It took about 3 hours.  I worked solid the whole three hours and my sister helped for about an hour and a half.  The hardest part was sawing once the blade got dull.  So I would recommend having a spare blade for your hack saw.  It just takes a little elbow grease, but isn't too hard or complicated.

It was a really fun project and just totally changed the look of the room.
 I even spray painted the ugly brass part with a high heat spray paint to make it look more updated.  Makes a huge difference.  My awesome husband also helped me figure out how to take the glass out of the gas fireplace and clean it.  That also made a huge difference.  I can't believe I have never cleaned it before.  But to my defense, I always covered up the fireplace with a cute gate thingy because I HATED it so I never saw the glass anyway.

Eventually I will get a few more things on the wall but for now it is cozy and I love it.

Thursday, April 9, 2015

Custom Made Sled Light

In case you missed it....here is my new kitchen.  LOVE IT!
Want to see how I made one of my favorite parts of the new kitchen?

Remember my old cute sled?  It used to hold my pots and pans. 
 I saw the idea in a magazine years ago and found the perfect sled at an antique store about 12 years ago.  It was so nice to have a place to hang my pots and pans because my kitchen was TINY!  Now we have renovated our kitchen and have plenty of room for pots and pans.  I hated to give up my sled, so why not repurpose it?  I wanted to make a cool, custom made light for our new kitchen that would incorporate mason jars.  While trying to figure out how to hang the mason jars, I thought of using the sled.  It is perfect and even matched the theme of my new kitchen.  I didn't even have to paint it and it PERFECTLY matched the paint color I used for my barstools.  The problem was.....how to make it work.

So after many brainy discussions with my dad (the electrical engineer), my hubby, the helpful guys at Home Depot and many a Pinterest searches we finally figured it out.

Here is what we did.  I tried to take as many pictures as I could but sometimes we changed things on the fly and sometimes we were figuring it out as we went along, so if you have questions, feel free to ask!

Here are the supplies we started with.  

Black Spray paint (because NOTHING comes in black anymore.  WTH?)
Black Chain (x2)
Cord socket from IKEA (on sale for $5- win!!)
Canopy set (painted with spray paint)
Mason Jars (Hobby Lobby 50% off)
Lid inserts (Hobby Lobby 50% off) so it doesn't get too hot inside the jar and to make cool designs on the ceiling) -----Also made hanging the light sock inside the jar VERY easy!


Here is what we had to buy after 3-4 more trips to Home Depot and figuring out what we REALLY needed (sorry, these aren't pictured)
Nipple set (no kidding- it is actually called that)
Leftover masonite to make a box
Leftover red paint from Barstools
4 Carabiners (painted black)
Black fastener thingys (that is a technical term) for holding the cords down.
Crazy strange powerstrip (see picture)
Extra Metal brackets that screw into the electrical box (came in the package with the large nipple) 
New plug kits

We started by figuring out we had to make a box to go on top of the sled.  This box would house all of the cords.  We then painted the box and mounted it to the top of the sled (if you can't see the top of your sled you can skip this step, but we can see the top of our sled as we come down the stairs so we wanted to disguise it).  The IKEA cords come with a plug so we had to make something for the cords to plug into or we would have had to have 6 cords going up into the electrical box (which was much more difficult).  We did cut each cord (to make it the right length) and to be able to fit it through the holes we drilled in the box (and so we could put the bulb end of the cord into the mason jar lid insert).  Then we rewired the plug and plugged them into the powerstrip.  Then we had an extension cord that came out of the box and ran up into the electrical box).  We also had to tack down all of the cords so they would sit nicely on the top of the sled.  Then we threaded the one wire up to the box and hung the sled from Carabiners and 4 lengths of equal chain.   Hopefully the pictures will help you understand this process as it sounds (and was) really complicated.  *There was also a fair amount of drilling and threading wires through things to make all of this happen.  Again, if you are trying to make one of these feel free to ask questions.

See the "black fasteners/thingys"?
The "power strip".  See how the IKEA plugs were replaced with a new white kit plug?
Setting the power strip inside of the box
Top view of the box with the lid on so you can't see any wiring
It is ready for a light bulb and for the jar to be screwed on.
A view of the back side and the cord going up into the ceiling.
I LOVE how it turned out.  We put it on a dimmer switch and it is nice to be able to adjust the brightness as there are 6- 60 watt bulbs.  
These iPhone pictures don't really do it justice but it looks so cool if you are looking in from the outside of the house.  Pay no attention to the total disarray of the kitchen.  Just fix your eyes on the pretty light fixture.  Ignore the house that got trashed by my sweet children during the hours it took to figure all of this out and get it done.
For the other lights in this area, we did a much simpler version.  For the one above the sink we used the same mounting system but all we needed was the cord hanging down.  SO. MUCH. EASIER.  We also used a larger Mason Jar to make more of an impact.
For the lighting in the entry way I found this lighting kit at World Market.  You can find it here (or in your local store-although I had to ask because they didn't have it out on the floor).  We had to made it more difficult and changed out their sockets for the IKEA ones as theirs didn't fit inside of the Mason Jar insert.  So we cut those out, and then rewired the IKEA ones through the insert and then up into the mounting bracket.  It was actually pretty easy.  And now I am a champ at wiring light fixtures.  It really is easy!
 Don't you also love my new/old door coat rack?  I found this door at an antique shop for $30.  It was perfect.  Chris had to cut off a few inches to make it fit the space between the front door and the closet, but I love the old charm of it.
I still want to put one more Mason Jar light where our ceiling fan is.  But I am currently losing that battle with my husband.  Check back in a few months and see how things are going.

I love how the mason jars make it feel homey and hand-made.

Tuesday, April 7, 2015

Remodel- Part 3 The Reveal

I know I have been torturing you with terrible, blurry, dim lit, iPhone pictures and the tales of woe of redoing our kitchen.  No more!  Now it is time for the fun stuff.  Here is the newly remodeled kitchen.  I LOVE IT!

Here are a few before and after pictures because I love before and after pictures.

 Here are a few of my favorite elements in my new kitchen.

Farmhouse sink.  Need I say more?
 Love this EAT sign I found at World Market.  It was even the right color!
 The island.  My fav.  I love that we now have eating space for 12 people.  We decided to go with butcher block to help warm up the space since we had so much black, white and gray.  I love the way it turned out.  We bought 12" boards of the butcher blog from a guy in the Springs and then my dad and Chris put them together using a Kreg jig and then finished it off with oak trim.  It is beautiful.  I LOVE it.
 We wanted to do something with our old kitchen table so we took off the old table top and added the butcher blog to the existing legs.  Then I painted the legs and the chairs white with chalk paint.  I love the results.
(more on the table in a later post)

The command center.  I love this organizer from Hobby Lobby.  I love that I have a place to put mail, papers for the kids, permission slips, bills etc.  I also love that there are cups that keep our pens, pencils and markers organized.  It makes homework time so much easier.  Don't you love that I didn't even clean up the papers.  I am kind of a "what you see is what you get" kind of girl.  Not many false pretenses.
My amazing husband made this ruler for me last Christmas.  I love it!  It now matches the pretty new floor too!  I also love this "L" from the clearance section of Hobby Lobby and the canvas of the boys.  (Also take note of my new light switch.  Hooray for lighting!)
We had a little extra room in the budget so we got new white doors!  I love this new front door with the little windows that let light in.  I also love the white molding throughout.  Prefinished awesomeness that is SO easy to clean.
 We wanted to get a little creative with the backsplash.  This was my hubby's brain child.  I was a bit reluctant as I wanted something more traditional (and more expensive) like tile.  We had these leftover hickory planks in our basement from the previous flooring we put in 12 years ago.  He thought it would look cool to stain it and use it as a backsplash.  You were right honey!  It looks so amazing.  I love the whitewash and gray stain and the fact that we left some of it natural.  It is unique, was free (except for the stain) and if we don't like it in the future, easy to remove and change!
 I found these old library stools at the Habitat for Humanity ReStore.  I happened upon them one Saturday.  There was another family looking at them so as soon as I spotted them, I grabbed one and took it directly to the register and told her I wanted all 6 of them.  How's that for impulse buying!?  They were $15 each!!!!  They are really sturdy and have such a beautiful shape.  My friend Jessica helped me paint and distress them and I can't even tell you how much I LOVE them!!! 
Enough for now.  More to come!  Stay tuned for more construction pictures and our living room re-do.

Kitchen Remodel- Part 2

So within days of deciding to redo our kitchen we were doing demo.  This included getting rid of the stupid wall in the middle of our kitchen.  We also got rid of all of the old cabinets, popcorn ceiling, flooring and lighting.

Here is what my "temporary kitchen" looked like.  We had great intentions of eating simple, easy meals and trying to save money by eating in during our reno.  Who were we kidding?  By the time dinner time came I didn't have the time or energy (or kitchen) to make a meal.  Fast food ruled our diet for months.

 The cabinets that used to be against the wall were moved to the other side by the window or down to the living room.

Nothing beats cute kids demo-ing a wall, right?  They loved writing on the wall and then taking the hammer to it.  So, so messy.  Feel like I am STILL cleaning up drywall dust. *Note: Many of these pictures were taken from my iPhone so the quality might be lacking.  They were usually taken in the wee hours of the night when I needed to prove that I actually accomplished something that day.


A few before and after demo pictures for you.  
 The worst part of the process.  The ceiling.  So messy.  So much time and effort.  So many arm and neck cramps.  After we scraped all of the popcorn off (using water to soak it and then scraping- ours didn't contain asbestos thank goodness) we decided we would get a bid to see how much it would cost to have it textured.  It was $1700.  To which we thought was severely overpriced and decided it would be worth it to do it ourselves.  Now I can say with confidence......those drywallers and texturers (it's a word) earn every penny they make.  I still don't want to pay $1700 but I now understand why they charge so much.  It SUCKS!  Chris and I spent a 12 hour day, with both of us skim coating the ceiling.  Just the skim coat.  We probably should have done another skim coat but we just didn't have it in us.  Then the texturing took another 12 hour day where both of us worked together.

Then it was time to prime (2 coats) and paint (2 coats).  Needless to say that the ceiling and I are no longer on good terms.  I am a bit resentful.

Our poor children were ignored, watched a lot of television and/or spent a lot of time with their grandparents.  Don't judge. 

Also, everything was covered in plastic for several days which made it hard to get to: water, bathrooms, stove, sink, fridge....and every other place in our house.  Doesn't this post make you want to start a remodeling project?

The most important part of the renovation....the part that made the biggest impact......LIGHTING.  We only had 3 lightbulbs (plus a lamp and a 1970's light in the entryway) in the whole area.  Now we have 17.  Might be a bit of an overkill, but I LOVE it.  I love that even at night, it is so bright and cheery in my house.  Something that was hugely lacking in my old kitchen area.  I will do another blog post on the sled that we turned into a light fixture in another post.

We even had to cut a new access to the attic so we could run all of the new electrical.  The kids loved being up there and they even got to help wire a few new boxes and switches.  So cool to see them learning these skills.  *No children were harmed in the making of this kitchen.  Maybe a slight shock, but not seriously harmed.
So thankful to my sister (construction rock star), my dad (that Eletrical Engineer degree and masters comes in handy), my handy husband and my mom and mother-in-law who helped with kid duty.
Once we were done with lighting, we took the rest of the wall down.  We used it as a scaffolding when we were doing lighting and scraping the ceiling.  It came in pretty handy!  But look how amazing it looks without the wall.
Next came removing the cabinets and preparing for flooring.
Life was mixed up and chaotic.  Everything was everywhere and everything was FILTHY!  Now can you see why I couldn't cook?  Even looking back at these pictures it is giving me a little anxiety.  I am a control freak and having everything so chaotic did not sit well with me.

Sorry for such a long post.  But I had to show you all of the work in progress.  Next time I promise to show you the finished product!